AI Ecommerce Photography for Shopify: The 2026 Implementation Guide
Most Shopify merchants approach AI product photography as a tool selection problem. It is not. It is a workflow problem, and the stores winning in 2026 have solved it inside Shopify admin, not inside a browser tab full of generators. At Absolutely AI we have watched dozens of DTC brands rebuild their catalog imagery this way, and this guide is the implementation playbook we wish existed when we started.
Most Shopify merchants approach AI product photography as a tool selection problem. It is not. It is a workflow problem, and the stores winning in 2026 have solved it inside Shopify admin, not inside a browser tab full of generators. At Absolutely AI we have watched dozens of DTC brands rebuild their catalog imagery this way, and this guide is the implementation playbook we wish existed when we started.
This piece walks the full stack: what AI ecommerce photography actually covers, which tools plug natively into Shopify, the five-step admin workflow, a reusable prompt scaffold, and the compliance line every merchant needs to know before touching a product listing.
Why Shopify stores are moving to AI product photography in 2026
The economics have flipped. A traditional studio shoot carries a real per-SKU cost once you factor styling, lighting, retouching, and reshoots for every variant, and that cost scales with the catalogue. Generated imagery does not scale the same way, which is the whole argument: the marginal cost of the four hundredth variant is close to the cost of the first. Reporting on merchants replacing static packshots with in-context lifestyle imagery points to better conversion, though the published figures vary by category and none of them are directly comparable, so treat the direction as the useful part rather than the number. Merchants who read the real cost breakdown stop debating whether to move and start debating how fast.
The bottlenecks AI unblocks are the ones DTC brands feel every week: seasonal drops that need six lifestyle scenes shot in a week, variant sprawl where a single hero product needs eight colourways photographed identically, and marketplace-format duplication where the same shot has to exist as a 1:1 for Instagram, a 4:5 for TikTok Shop, a 16:9 for Meta ads, and a clean white-background hero for Amazon and Google Shopping. Traditional photography scales linearly with cost. AI photography scales with prompts.
The stores that have made the jump are not the ones with the biggest budgets. They are the ones who stopped treating each shoot as a one-off event and started treating their catalog imagery as a system.
What AI ecommerce photography actually means (and what it does not)
The phrase covers four distinct capability tiers, and conflating them is the single most common reason merchants pick the wrong tool. A clear framework for how the underlying tech works saves a lot of trial-and-error.
- Background removal and replacement. The lightest tier. Take an existing packshot, cut out the product, drop it onto a new backdrop. Photoroom and Shopify Magic sit here.
- Scene generation from a packshot. Feed the tool your product photo and a text prompt, and it generates a full contextual scene around the product while preserving the SKU. Claid, Pebblely and Flair AI live in this tier.
- On-model and try-on. Take a flat-lay garment or accessory and generate a photorealistic model wearing it. CreatorKit and Lensia lead here for apparel and Shopify Collabs use cases.
- Full synthetic product shots. Generate a product image from scratch, no source packshot. This tier is the highest risk because the model can invent details that do not match the physical SKU, and it triggers Shopify Shop Promise misrepresentation concerns.
The higher the tier, the more editorial control you get and the more compliance care you need. Most Shopify catalogs sit best in tiers one through three, using real packshots as anchors. Tier four is for hero campaign work where a directed creative treatment is the deliverable, not a PDP tile.
The 6 AI photography tools with native Shopify integration, ranked
Every roundup on the internet lists the same twenty apps. The list that actually matters is much shorter: the tools that install as a Shopify app, push directly to product listings, and handle bulk operations without exporting and re-uploading through the Files API. This is that list.
| Tool | Shopify app | Bulk mode | On-model | API access | Best for |
|---|---|---|---|---|---|
| Photoroom | Yes | Yes | Limited | Yes | Background swap at scale, marketplace formatting |
| Claid.ai | Yes | Yes | No | Yes | Scene generation, catalog consistency across variants |
| CreatorKit | Yes | Yes | Yes | Yes | Apparel try-on, video-first product pages |
| Pebblely | No (export) | Yes | No | Yes | Lifestyle scene generation, homewares |
| Lensia | Yes | Partial | Yes | Limited | Fashion on-model, DTC apparel |
| Flair AI | No (export) | Partial | No | Yes | Design-forward scene composition, hero shots |
Shopify Magic sits alongside these as a native option, but it currently covers only background editing and copy generation, not scene synthesis. If you want a fuller comparison of the two dominant scene-generation tools against agency work, the Pebblely vs Photoroom vs agency breakdown is worth reading before you commit to a stack.
The right stack is usually two tools, not one: a bulk-mode scene generator for the long tail of PDP imagery, plus a specialist for the top 20 percent of SKUs that drive the majority of revenue and deserve editorial attention.
The 5-step workflow inside Shopify admin
Tool selection is 20 percent of the job. The other 80 percent is the operational loop that gets images from generator to live product listing without breaking your catalog. Here is the workflow the fastest-moving Shopify teams run.
Step 1: Audit current PDPs with the conversion-by-image test
Open Shopify Analytics, filter by product, and sort your top 50 revenue SKUs by conversion rate. The bottom quartile is your priority queue. These are the products where the image is the bottleneck, not the price or the copy. A quick strategy audit here saves weeks of regenerating imagery that was never the problem.
Step 2: Source clean packshots at 2048px or higher
Every AI tool in this stack works from source imagery. Feed it a low-res or over-compressed packshot and the output will inherit the compression. Reshoot the anchor packshots on a phone against a plain wall if you have to. Resolution and clean edges matter more than lighting at this stage.
Step 3: Generate variants using your saved prompt scaffold
This is where the prompt scaffold from the next section pays off. Same scaffold, different SKU slot, consistent catalog. Batch through your chosen tool in sets of 50 to 100 SKUs so you can QA in blocks rather than one at a time.
Step 4: Bulk-upload via Matrixify or the Files API
Never upload catalog imagery one product at a time. Export a Matrixify sheet with SKU, image URL, alt-text and position columns, drop the AI outputs into your CDN, and re-import. For teams with dev capacity, the Shopify Files API does the same job programmatically and pairs well with an alt-text automation that reads the product title and generates SEO-friendly descriptions. This is the step most merchants underestimate, and it is where an automation partner earns its fee.
Step 5: A/B test with Shopify Experiments or Intelligems
The 30 to 40 percent lift figure is a benchmark, not a promise. Run new imagery against your control for at least two weeks on your top-traffic SKUs using Shopify Experiments (Plus only) or Intelligems. Split traffic 50/50, hold everything else constant, and measure add-to-cart rate and PDP conversion. Kill anything that underperforms and iterate the prompt.
A reusable brand-consistency prompt scaffold
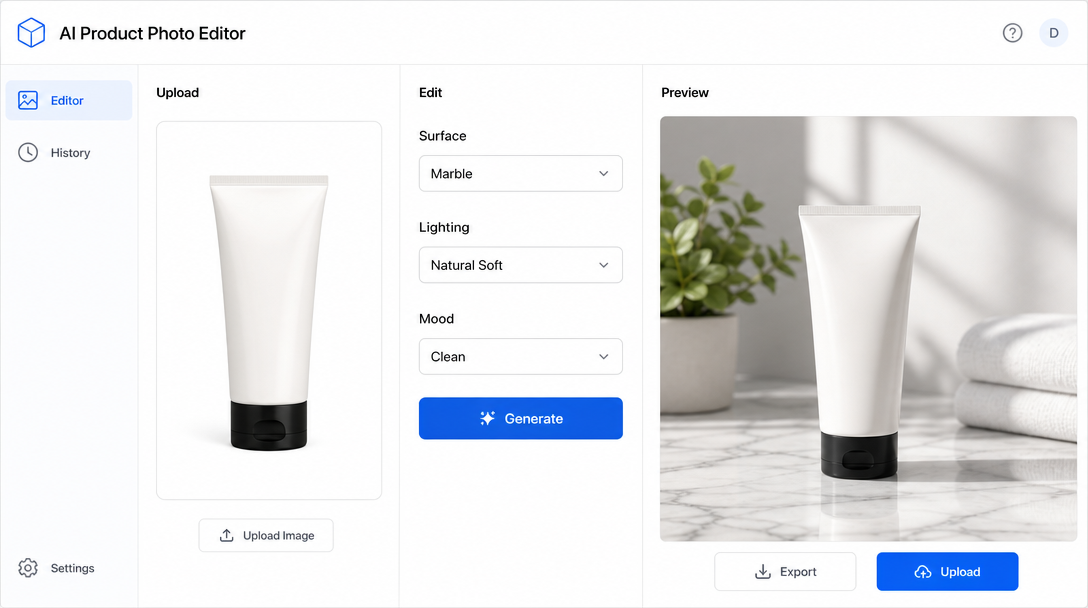
The single biggest catalog problem AI photography introduces is drift. Image one looks like a Kinfolk spread. Image forty looks like a Wish listing. The fix is a six-slot prompt scaffold you write once and reuse across every SKU, so the whole catalog reads as one visual system. This is the same discipline that underpins any serious brand system build.
- Product: literal SKU description, colourway, material
- Surface: the plane the product sits on, in one phrase (warm travertine, pale oak, crumpled linen)
- Lighting: direction, quality, time of day (soft north-facing window light, late morning)
- Camera: lens equivalent and angle (85mm, three-quarter view, slight top-down)
- Palette: three to four supporting colours the scene can pull from
- Mood: one adjective, no more (quiet, editorial, energetic)
Save the scaffold as a text snippet, swap only the product slot per SKU, and your catalog holds together. Merchants who skip this step end up regenerating half their imagery six months in when the visual inconsistency becomes obvious on a mobile grid view.
Real conversion lift: three mini case studies
The numbers below are anonymised composites from Shopify Plus stores running the workflow above, not marketing spin. Every merchant looking at AI for catalog work should read the head-to-head comparison alongside these figures to calibrate expectations.
- Skincare (42 SKUs): replaced flat-lay packshots with Claid-generated bathroom-counter scenes using a fixed scaffold. PDP conversion moved from 2.1% to 3.0% over a four-week Intelligems test. Cost: $84 in generation credits.
- Apparel (180 SKUs): added CreatorKit on-model imagery to every product page alongside existing flat-lays. Add-to-cart rate up 34%, returns down 6% (fewer size-fit surprises). Cost: roughly $2 per SKU.
- Homewares (95 SKUs): Pebblely-generated room scenes replaced isolated product cutouts. Sessions with product image interaction up 51%. Average order value up 18% as customers began cross-shopping the styled sets.
The pattern is consistent: contextual imagery beats isolated packshots, and consistency across the catalog compounds the effect.
Compliance: Shop Promise, misrepresentation, and Google policy
The line every merchant has to hold is simple: the image must accurately represent the physical product a customer receives. Shopify Shop Promise reviews listings for misrepresentation, and Google Shopping enforces the same standard. AI is not the risk. Hallucinated product details are. If your ceramic mug generates with a handle shape it does not have, or your dress generates with a neckline it does not have, that is a violation regardless of whether a camera or a model produced the image. The full IP and disclosure breakdown covers the rules in more depth.
The safe operating pattern: use tier one to three tools with a real packshot as the anchor, QA every generated image against the physical product, and reserve tier four synthetic generation for lifestyle contexts where the product is a supporting element, not the subject.
When to still hire a human photographer
AI does not eliminate photography. It reallocates it. The work that still belongs behind a real lens: hero campaign imagery for a brand launch, luxury goods where material honesty is the entire selling proposition, food where under-scale texture and steam read as production value, and any imagery that will front paid social spend above $10,000. That is the tier where senior creative direction earns its keep, whether the final frame is captured or generated.
The rule of thumb: if the image is a catalog tile, generate it. If the image is a campaign, direct it.
Frequently Asked Questions
Is AI product photography allowed on Shopify?
Yes. Shopify has no policy prohibiting AI-generated imagery. The requirement is that the imagery accurately represents the physical product. Shop Promise merchants face closer review, so anchor every generation to a real packshot and QA against the SKU.
Does Google penalise AI product images?
Google Search and Google Shopping do not penalise AI imagery per se. They penalise deceptive listings. If the AI image misrepresents the product, that is a Merchant Center policy violation. If it accurately shows the product in a generated scene, it ranks and converts identically to a photographed equivalent.
Do I need to disclose that images are AI-generated?
Not on Shopify PDPs under current policy. Some jurisdictions (notably parts of the EU under the AI Act) are moving toward disclosure requirements for synthetic media. The practical answer for 2026: no proactive disclosure needed on catalog imagery, but keep source packshots on file in case of review.
Shopify Magic versus third-party tools: which should I use?
Shopify Magic is free, native, and covers background editing and copy. It does not do scene generation or on-model at the quality bar most brands need. Use Magic for quick background swaps, and a specialist tool from the table above for anything more.
How do I handle image alt-text at scale?
Automate it. Use a Shopify app or a Files API script that reads the product title, variant, and image position and generates alt-text in the pattern "[Product] in [Colour], [Angle] view." This handles SEO and accessibility in one pass and stays consistent across the catalog.
Can AI handle apparel and on-model imagery reliably?
For 2026 the answer is finally yes for most categories. CreatorKit and Lensia produce commercial-quality on-model imagery for basic apparel, accessories, and eyewear. Complex garments (structured tailoring, sequinned surfaces, sheer fabrics) still benefit from real photography or hybrid workflows.
What is the fastest way to test AI photography on my store?
Pick your five highest-traffic PDPs with the weakest conversion rates. Generate three new scene variants for each using a single tool and a fixed prompt scaffold. Run a two-week Intelligems or Shopify Experiments test. If the lift is there, roll it out. If not, iterate the scaffold before expanding scope.
Bringing it together
The Shopify merchants winning with AI photography in 2026 are not the ones with the fanciest tool stack. They are the ones who built a repeatable workflow, wrote a prompt scaffold once, and treated their catalog as a system rather than a series of shoots. If you want a partner to design that system with you, Absolutely AI runs the full stack from creative direction through to content production at catalog scale, tuned specifically for Shopify workflows.